Monday, October 14, 2013

Dr. Scholl's Active Series Insoles

I was chosen to participate in the Influenster Dr. Scholl's Active Series Vox box, which means I was sent a free pair of the insoles to try.  According to the product literature, these insoles offer triple zone protection (ball of foot, arch, and heel,) and they are supposed to help prevent pain.  Now, anyone reading this probably knows (or can infer) that I am mobility impaired, and I use a cane for mobility.  I also have balance issues, due to a head injury.  I have chronic leg pain, as well as pain that radiates from my back.  I was really hoping I'd see a difference using these insoles, but they did not help alleviate my pain. 

The insoles I received were a size 51/2 to 8.  Depending on the shoe, I wear either a size 7.5 or an 8.  The photo shows the insoles placed into my size 7.5 Tevas.  As you can see, the toe area of the insoles is quite a bit narrower than the toe part of the Tevas, while the heel portion is wider than the Teva heel.  The instructions that come with the insoles state that you should remove the insoles from your current shoe and use them as a guide to trim the Dr. Scholl's insoles to the proper size.  When I pulled the old insoles out of my sneakers, a size 7.5, the Dr. Schools insoles were narrower at the toe than the insoles I was replacing.  The old insoles were a bear to get out, and the new insoles were smaller than the ones I was trying to replace.  I could not get the old insoles back in properly, nor were the new ones a proper replacement for the ones I removed.  Thus, I ruined my sneakers trying to change out the insoles.  I now have increased pain when I try to wear my sneakers, due to a too small insole which does not cover the toe area of the sneakers.  Additionally, the arch part of the new insoles hits my foot at the wrong point, negatively effecting my balance.  I am not sure they are appropriate for anyone that does not wear narrow width shoes.

I think Dr. Scholl's needs to make these insoles available in a wider variety of sizes.  Perhaps a 7-8 wide would have worked for me.  Perhaps these insoles would work better for someone without all of my issues.  But for this mobility-impaired person, the insoles were just not a good fit, and thus, I cannot recommend them.

Thursday, May 30, 2013

Palmolive Soft Touch Review

I received 2 bottles of Palmolive Soft Touch from Influenster for review.  Now, I receive many free samples, and I'm very picky about which of these I integrate into my repertoire, but I WILL be buying Soft Touch again.  It's a great, all around household product.

I received 2 varieties: coconut and Vitamin E.  Unfortunately, both bottles leaked in shipping, so I received a slimy mess!  However, this allowed me to evaluate the product before I actually put it to use.  First thing I noticed was the pleasant scent.  This stuff is not overwhelmingly scented.  It's scented just enough to overpower those odors that arise from food remnants left on dishes before they hit the sink.  The next thing I noticed was the feel.  This soap definitely feels more like a body wash than like a dish soap.  It's thick and luxe like my expensive moisturizing body wash.  Its viscosity is closer to a body wash as well.

But this IS a dish soap, and not a body wash, so the big question is how does it do on dishes?  As good or better than the brand I had on hand (Dawn.)  It also softens your hands while you wash dishes, so there's no need to apply a separate lotion when you are done.  In fact, the soft touch has replaced the hand soap I used to keep by the kitchen sink. 

Years ago, when palmolive was green, Madge the manicurist used to tell folks "You're soaking in it."  Palmolive ought to revive that campaign for this new soap.  Soaking your hands in this palmolive does not dry them out at all.  My skin does not feel tight after washing with the palmolive.

It's also great for getting that crud that ends up on you, instead of on the plate, out of your clothes.  I spot-cleaned my dress after cooking food "popped" on me, and the palmolive did an excellent job of preventing stains.  Dabbing a soapy towel on the spots immediately got them out without leaving soap spots in their place.

Out of the two flavors I received, I prefer the coconut.  But then I love all things coconut anyway, so that's not surprising.  I haven't noticed any difference in how the different flavors perform.

If you are looking for a dish soft that softens while it cleans, try Palmolive Soft Touch.  You'll no longer need those rubber gloves for washing dishes.

Wednesday, December 5, 2012

Recycle an Old T-Shirt into a Beautiful Infinity Scarf!

Infinity Scarf Tutorial


I think it was on a BuzzFeed post that I first saw a photo of a T-Shirt Scarf, and I was immediately inspired.  Who doesn't have a ton of old T-shirts laying around, just awaiting re-purposing as something other than rags!  I hit google, looking for further inspiration and immediately found examples posted by other creative people.  None of those seemed exactly what I wanted though.  So, me being me, I took what I liked from each, put my own spin on them, and came up with my own potential design.  Then I grabbed a pair of scissors and an old shirt, and I started cutting.  After about the 3rd shirt, I had a process down.  Now, with about a dozen prototypes under my belt, I feel comfortable sharing my methods.

Supplies:

To complete this project, as shown, you'll need the following:
  • An old, colored T-Shirt, the bigger the better.
     
    For an adult, you'll really want to use a Large, XL, or even larger, up to 3XL.   White-based T-shirts will work for the basic scarf, but not so well for the bleach-dying that follows. 

    Don't worry if there is a design on the shirt (it'll blend in), or even small holes (you can work around these when you cut.)
  • A decent pair of scissors.

    I'd love to experiment with throwing pinking shears into the mix, but I don't own any.  If you do, feel free to use them.
  • A couple of cups of good old-fashioned Bleach
  • A couple cups of White Vinegar
     
    Optionally, also have a spray bottle of white vinegar handy
  • Rubber Bands
  •  A couple of buckets, bowls, and/or deep bins
  • A basin or bucket full of Cold Water

Process:

 I suggest that BEFORE you attempt this with a full shirt, first cut off a sleeve,  and follow all of the steps using the sleeve as practice. You'll end up with a doll or cat-sized scarf  at the end.  Then, you can try it with the rest of the shirt, and you'll have a better feel for what you're doing.

Make the Scarf

 Lay the shirt out like a "t", so the collar is at the top & the hem is at the bottom. From now on, I'm going to call the top part side "F", and the bottom (hem) part side H. Remember that as I continue.


Cut the shirt across at the armpits, basically cutting off the sleeves to the collar. (It's a HORIZONTAL cut if you have the shirt looking like a T.)  What you'll be left with is a big tube and a little dickey. If there is any design left, do not worry. Cut off the hem (horizontally) as well and save for later use.


Cut fringe to desired length along side F. What's left of the design will disappear into the fringe.  (As you can see by the picture, I cheat a little and fold the shirt while I cut the fringe.  I suggest you NOT try this until you have at least one scarf under your belt.)


Next, turn the tube so the folds are at the top & bottom. Side F will now be on the left/West of the tube, and side H will be toward the East/Right.  (In the above photo, what is left of the design is on side F of the tube.)

Fold up the bottom fold so that it's about 1/2 -  3/4" from the top fold. You'll be making VERTICAL cuts from the bottom (South) fold, just up to the top (North) fold. You want to stop so that the loops are still attached by that solid, North/top strip.

For orientation purposes, I've run the piece of hem through the tube where you will need to run it through later.  You'll want to leave a width just a little wider than your hem piece. The clothespin represents the top fold, as it's hard to see in the photo, or the distance I'll be cutting to.


You'll want the western most cut to be about the same width away from the fringe as the length of the fringe. The easternmost loop/strip should be at least an inch wide, probably slightly more. The loops in between should be about 1/2 - 3/4  inch wide. I start at the fringe/left side, and start cutting loops/strips from left to right.


I like to vary the widths of the strips and cut them kind of wavy.


When you've gone all the way across, you'll have long loops attached by a solid strip at the top.  I've unfolded the loops on the right side of the above photo.


BEFORE threading the hem piece through the top, trim the solid piece to the length of the fringe for smoother knotting/hanging later.  I did some "clean-up" detail refining after taking the above photo, but it gives you the idea.  (I discovered this around the 3rd or 4th scarf.  It's not crucial.  It just makes the next step a little easier.)


When the loops/strips are all cut, thread that hem piece you saved through the top part, where you didn't cut the loops all the way through. Gather it up, so the string runs along the North, and the loops hang south. Make sure the hem piece is through all the loops. Tie a larks head knot.


DO NOT pull it tight until you make sure you threaded the piece right, through ALL the loops.  It often takes a 2nd try to get it right, even with a dozen or so scarves under my belt.  I had to do it a 2nd time making THIS particular scarf.


If the hem is still a solid loop, cut it so it has 2 strings.Then tie a regular knot. Wrap the tails around in opposite directions to cover ugly loop, and to make it look smoother, then tie another knot. Tie this one tight.  It's going to hold the whole shebang together.


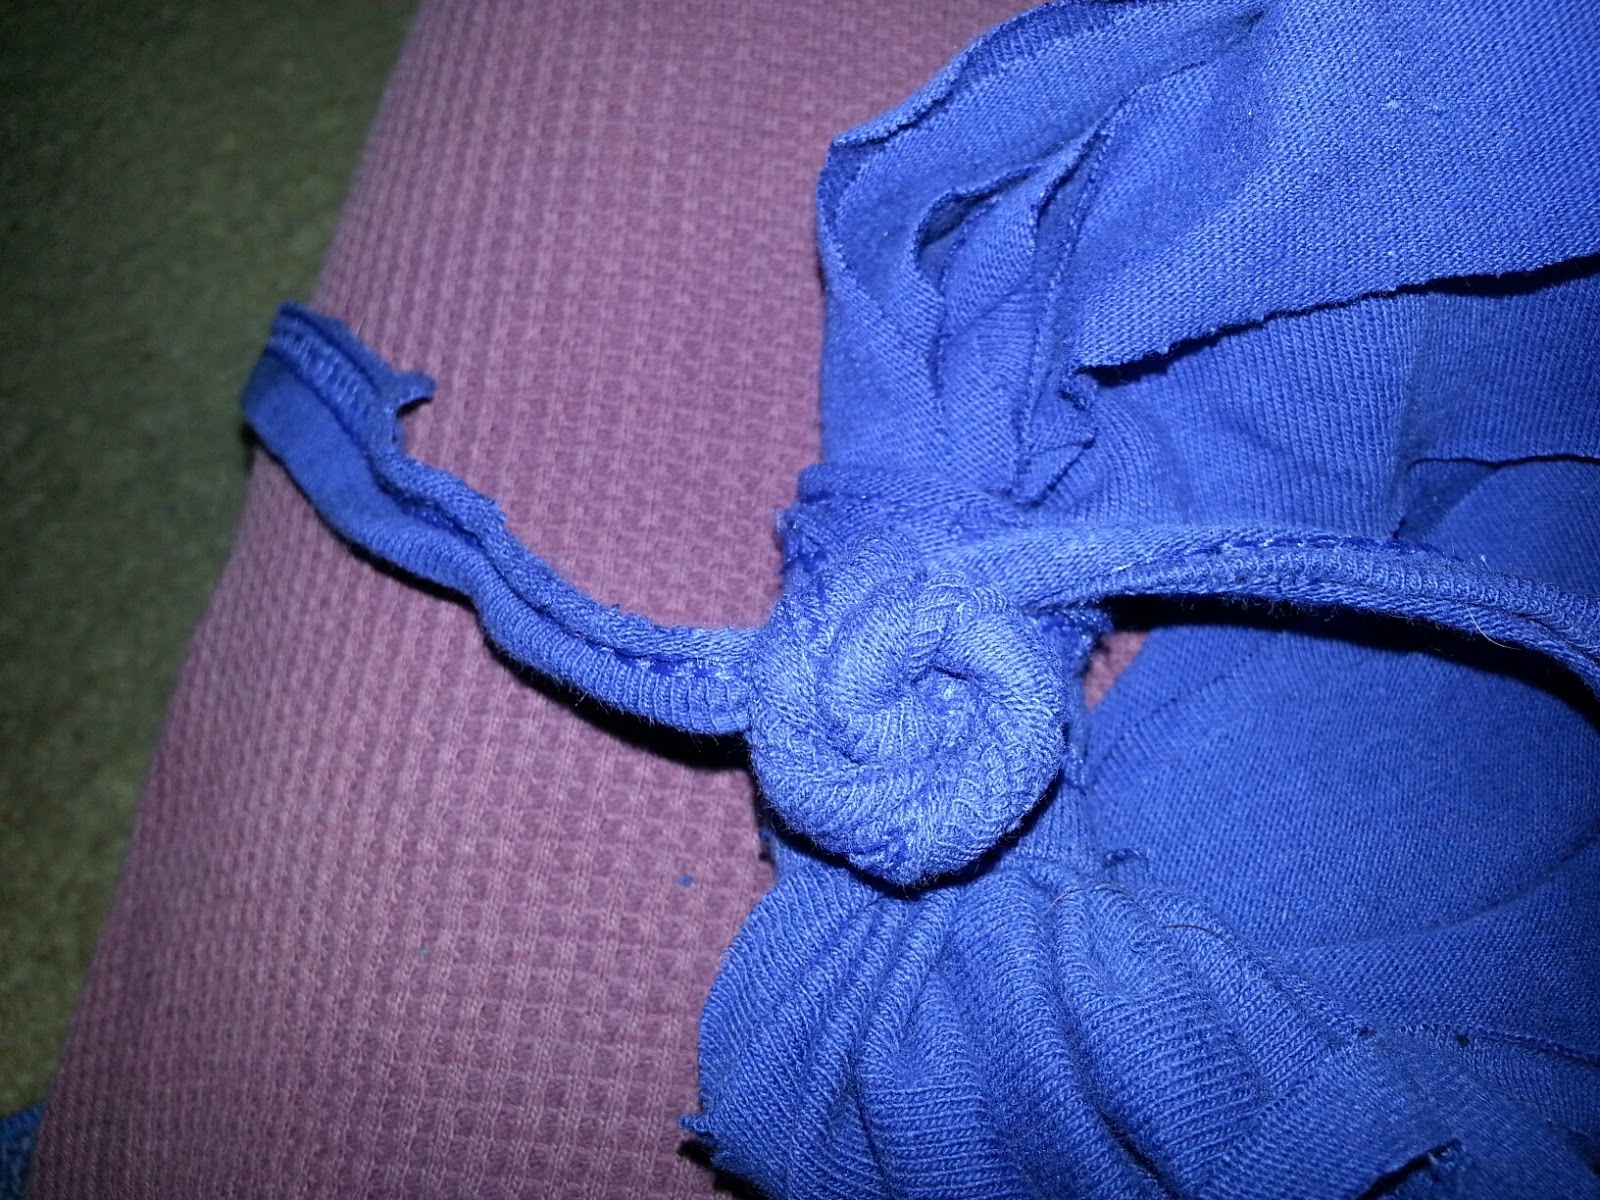
I like to twist the tails into a decorative rosette, then knot that for a total no-sew project. If you wanted, you could wrap a scrap of leftover shirt around the knot, and then stitch it tight.

To make the rosette, first twist each piece of tail into a thin rope, then twist the two twists around each other to form one rope.  Coil it like you were forming a hair bun.  To secure, break remaining tail back into two twists.  Wrap each twist in opposite directions around rosette and knot to secure.


Cut the tails into "leaf" shapes, and you're done with your knot.  Last step is to pull out the loops/stretch them. Next, hold your finished infinity scarf by the knot and shake out.  Grab opposite end with other hand (or place on toes) and STRETCH.  (Sorry, I couldn't take a photo of this step.)  Do the same with the fringe, and optionally knot every other piece of fringe and/or bead. Shake out again, and you're done!


Optional: Bleach Dye the scarf

Sorry...no photos for this part.  We're basically going to tie-dye the scarves, but instead of adding color with dye, we'll be  removing color with bleach.   You'll want to use regular, old cheap bleach for this, and NOT any of those fancier color-safe types.  The white vinegar will stop the effects of the bleach.  This is important to remember during this process.

Also, remember it's easier to re-dip a scarf than to try to put the color back into it.  Use a slight hand with the bleach and a generous hand with the vinegar until you get the hang of this.  You can practice using leftover T-shirt pieces, or you can use scraps as test strips before you dip a scarf, if you wish.  I like the surprise element of this process myself.

To prepare your piece for dying, grasp the knot in one hand, and the opposite end of the loops in the other.  Twist the entire  length of the scarf.  Twist up the twisted scarf, knot it loosely, and otherwise ensure there are lots of areas "protected" by folds.  Secure in random places with rubber bands and/or use rubber bands to form patterns in the cloth.

Pour some bleach in a bucket, deep bowl, or bin, and pour vinegar to a similar level in another container.

Optionally spray small areas of your prepped scarf with vinegar before dipping the scarf into the bleach.  For a more ombre effect, dip each end in the bleach, but leave the middle un-dipped.  Immediately follow the bleach-dip with a vinegar bath.  Follow the vinegar bath with a soak in cold water.

If I'm doing a batch of these, I'll often let the washing machine fill while I'm dying, and I throw each scarf right into the machine after a quick rinse in the cold water.  I add a  half cup or so of vinegar to the water to ensure the bleach/dye process is completely set.  I also add some purex crystals or downy unstoppables to help get rid of the bleach smell.  I run them through the gentle cycle still banded, then into the dryer.  Once I remove the rubber bands, I throw them over a towel rack to let them finish drying.  (If they're still all balled up, they won't completely dry in the dryer.)  Alternatively, I hand wash them, again hanging them on a towel rack or drying rack to dry.

Caring for your Infinity Scarf

I provide the following care instructions with the scarves:
This "Infinity Scarf" is hand-made from a recycled t-shirt.  Each scarf is truly a one-of-a-kind item.

To care for your scarf, throw it in a mesh lingerie bag and toss it in the washer along with your other t-shirts.  Keep it in the mesh bag when you throw it in the dryer.  When you take it out, hold it by the knot and shake it.  Hang, if necessary, until completely dry.  You may need to gently stretch the loops after removing your scarf from the dryer,  Alternatively, you may hand wash it and fold it over a towel rack to dry. 

Hold your scarf by the knot and shake it out before each use.  You may loop it over your head more than once. Tug loops gently to adjust.  The knot can be worn behind the neck or draped decoratively to the side.  We suggest you loop the scarf over the neck of a hanger, with the knot at the top, or fold gently into a drawer/shelf to store.

Each scarf is hand-made by Laurel Nevans.

Wearing your scarf

You can wear your scarf with the knot in the back, or if you have neck issues like I do, with the knot on the side. (That's why you want to finish that part off nicely.)The larger the shirt you start with, the longer and wider your scarf will be.  The loops will start to curl up after going through the dryer for the first time; this is what you want to happen, and is part of the look. 

Gallery of In Process Scarves:


Here are some of the scarves I made, hanging on the laundry room towel rack to dry.  You can see the one white shirt hanging amongst the colored ones.  In the top photos, all the shirts (but the red one) started out black.  I thought the bleach hadn't "worked" on the charcoal one, as that looked solid black until it dried.  The green shirt in the middle photo has a subtle pattern that is not visible in the photo.  It's shorter as it was made with a size Medium shirt.  The shirts in the bottom photo started out black, red, navy, or teal.

I'll try to remember to keep adding pictures as I get more scarves made!  If you try this out, please share photos of your efforts!

Ideas for What to Do with your Scarves

I am making these for all of the women on my holiday gift list.  They make great gifts for teachers, mail ladies, your favorite server or bartender, your neighbor, etc.  If you have teen-aged children, they could recycle old school shirts into hand-made teacher gifts.  You really don't even need to be able to cut a straight line to make one of these!

EDIT: December 11, 2012

I've added a Gallery Page with some of the scarves I've done.  I'll be adding pictures as I complete scarves, so be sure to check back.  Send me pictures of your completed T-Shirt scarves, and I'll post them in the gallery!


Comments:

Please feel free to share your experiences making these scarves in the comments.  I'd love to hear any feedback readers have on the whole process as well!


Saturday, December 4, 2010

Funniest Video I've Seeen in Ages!

You have GOT to watch this if you want a good laugh.  It's a group of "celebrities" from all eras, singing "Let it Be" on some beach somewhere.  I put "celebrities" in quotes, as it includes folks like Fab from Mili Vanilli, David Faustino, Alfonso Rivera, and Tonya Harding, along with the likes of George Wendt, Glen Close, Daryl Hannah, Kathleen Turner and Peter Falk.  We also get Rikki lake, Harpo (identified as "Movie Star") Ricky Schroder and Benny from LA Law.  You have to watch the whole thing--blik and you'll miss a celebrity.  It's some kind of promo for a NorwegianTV show, but it's corn at its best, and one of the most random assembly of people I've seen in a long time.  Makes me REALLY wonder what the show is about.


Friday, July 16, 2010

In Memory of K-Mart Dude

About five years ago, I picked up and moved to an island in Florida.  I didn't know a single soul there, and of course, I was apprehensive about picking up and starting a new life on my own.  To top it all off, I moved smack dab in the middle of the Summer, when the islanders all flee home for cooler climates.  Needless to say, no one rolled out the red carpet for me.  Except for one individual.

There is a duplex across the street from my condo unit.  At the time, an “older” couple lived there.  They were extremely friendly.  They smiled and waved and told me what day to put out the trash.  Were it not for them, it would have taken me a lot longer to settle in.  In fact, he was the first local I spoke to after taking possession of my house, outside of the Realtor.  No one in the condo took the time to even notice I arrived, but the couple across the street went out of their way to notice me and make me feel welcome.

I remember my first trip off of the Island.  I went to the local K-Mart to buy those things you inevitably find you need in a new house.  As I was browsing the aisles, I had a sense of someone behind me.  I turned around to see the friendly man across the street. 

“Hi there,” he said warmly.  “Are you finding everything you need okay?”

“Thank you.  I'm still trying to figure out all it is I need, “ I replied.

“Do you know who I am?”  He asked.  Without waiting for an answer or an awkward moment, he continued “I live across the street from you.  Welcome to the neighborhood.  Can we do anything to help you settle in?”  he asked.

Being that we live in a resort community, his next question didn't phase me at all.  “Are you a seasonal person, or are you going to be here more often?”

“No.” I replied.  “I'm not in a dual-residence income bracket.  I can only afford one home,” I joked. 

“Glad to hear that.  You're just what we need in the neighborhood.  We think we're going to like having you across the street.”

That conversation meant more to this scared little transplant than I ever let on. 

Two days later, Hurricane Charley approached, and we had to evacuate the Island.  K-Mart Dude saw me as I pulled back into my driveway, and took the time to welcome me back.

“Don't worry.  We don't have evacuations like that very often around here.  And as you can see, the Island made it through all right.”

A few short weeks later, another storm approached.  I still knew like nobody in the local area.  K-Mart Dude saw me out walking my dog, and he took the time to approach me, to calm me about the oncoming storm.  He told me that most of the locals were not going to evacuate, and I shouldn't feel like I had to either.  He told me we'd probably be flooded in, but said that they'd be sitting it out across the street if I felt scared.  When we all waded out front a few days later, again, he took the time to check on me to see that I'd made it through my first storm all right.  He joked that at least I'd had power a day longer than he, and we laughed while trying to figure out how to string an extension cord across the street so they could save what was still cold in their freezer. 

Unfortunately, after a few short years, K-Mart Dude and his wife moved off the Island.  I never saw him again, but I thought of him often.  Today, I heard that he passed away.

Ironically, in the time since K-Mart Dude moved, I have become very close with the person who lives in the other half of the duplex, someone I never really got to know until K-Mart Dude moved away.  Duplex-mate and I went out for a drink in K-Mart Dude's honor.  Duplex-mate always drinks Rolling Rock, but when we got to the local watering hole, they had run out.  He had a Bud instead, and we raised our glasses in a toast to K-Mart Dude.  Then we decided to we needed to invent a drink in his memory.  We called over the bartender, and we told him we were going to invent the Blue Light Special, in honor of a very special person who had ended his run on Earth earlier that day.  We mixed Blue Curacao, Vodka, and Pineapple Juice, dubbed it the K-Mart Dude Blue Light Special, and raised our glasses. 

“To K-Mart Dude.  A guy as special as you deserves a drink as tasty as this.  We love you, and were lucky to have known you.  Here's to you and your life!”

Two minutes later, the bartender came out from the back.  “Look what I found hiding in the back of the cooler—a single Rolling Rock.”

At that moment, we knew K-Mart Dude had heard us, and that he was sending us a drink in return. 

“How like him,” I commented.  “Only K-Mart Dude would decide to return a toast from across spiritual planes.  Even now, he's still making sure everybody else is okay.”

I never did tell him how special he was for me.  K-Mart Dude was the first person to help take a strange place and make it feel like home to me.  He was the first neighbor I met when I moved to this Island, and as it turns out, my first real friend here.  I never realized how much I appreciated having them as my across the street neighbors until they moved off the Island, and I surely never realized how much K-Mart Dude had meant to me, had done for me, until he was gone.  Now, he has literally and truly moved on to a better place, and this place is all the worse for it. 

Here's to you, K-Mart Dude.  You touched many people in your life.  We love you, and we'll miss you!

(Real names have been replaced to shield the individual's privacy.  But K-mart Dude, you know who you are!)

Thursday, July 8, 2010

People with Disabilities: Where are Our Avatars?

Where's My Avatar?

I love the Internet.  On the Internet, folks just know you by your handle.  They don't know what you look like or what issues you may have.  Despite this, for several years, there has been a move to personalize the Internet experience.  Many sites and forums now allow you to create an Avatar to be your physical representation online. 

Yahoo, one of the largest Internet communities for decades, has a very intensive avatar-creating application.  Using it, you can create an avatar that has many of your own physical features.  You can adjust the shape of the face, the eye color, and the hairstyle.  You can dress your Avatar in a number of different outfits, and you can add cool accessories like sunglasses, hats, skateboards, and MP3 players.  But is there a single accessibility device amongst the avatar-decorating choices?  No.  My avatar can be riding a skateboard, but she cannot hold a cane!

1Avatar.com is a popular source for forum avatars.  They have 4 pages of avatars in just the “shoes and legs” categories.  But is a single one of these avatars wearing a brace or an orthotic shoe?  Is there a single prosthetic leg amongst the avatar choices?  Unfortunately, no.  Not a leg with a disability amongst the lot.

Try doing a site search for “disabilities” at 1avatar.com.  The result says: “Your search - disabilities - did not match any documents. “  You get the same results searching “cane,” “crutch,” “wheelchair,” or “hearing aid.”  At http://avatars.jurko.net/ you can find x-rated avatars, but a similar search on assistive equipment comes up empty.  Avatarsdb.com also comes up with no matches found when searching disability-related terms.  I can choose from a dozen Simpsons-related avatars though.

Avatarist.com actually has some search results for “cane” – a few sports logos and a picture of the doctor from “House”.  The Second Life store is the ONLY place I could find assistive equipment as accessory options for avatars.  Unfortunately, these have to be purchased through the second life marketplace, and they are more expensive than similar fashion accessories.

Wikipedia's definition of an avatar says:
“An avatar is a computer user's representation of himself/herself or alter ego whether in the form of a three-dimensional model used in computer games, a two-dimensional icon (picture) or a one-dimensional username used on Internet forums and other communities, or a text construct found on early systems such as MUDs.  It is an object representing the user”
My yahoo avatars DO NOT represent me.  I am “The Chick with the Stick.”  For my avatar to truly represent me, I should be able to add a cane.  (You can see my avatar at Laurelnev and at Laurel .)

Too bad all crips are not represented by House, M.D.  Is there a female with a disability on televison?  A happier character with a disability?  Any TV character that might come somewhat close to being "an object representing the user?"

I found another person complaining about the same thing at Yahoo Answers.  Here is the discussion:
Resolved Question: I am disabled and would like my avatar to reflect a truer image of me,how and where can I do this? including wheelchair, amputee and or nice clothing

Best Answer - Chosen by Asker

I have someone added on Messenger who has a wheelchair in their avatar, so I'm sure it's possible somehow.

I don't know about the amputee part though. Generally speaking, avatars that contain imagery that others might be sensitive toward are frowned upon due to the fact that trolls can get them just as easily as anyone else can.
By that reasoning, we shouldn't have goth accessories, the ability to add Asian features, or just about any options that are not plain vanilla.  Can't a troll misuse an X-rated Avatar far worse than he can abuse an avatar with an assistive device?

We are about to celebrate the 20th anniversary of the Americans with Disabilities Act (ADA).  Twenty years later, I still cannot have equal rights when it comes to my graphical representation.  The world still assumes that we want to hide our disabilities, whenever possible.  And that, my friends, is not always true.

Many people with disabilities spend more time in the virtual world than we do in “the real world.”  You will find a person with a disability amongst the most valued of contributors on any forum or Internet community you visit.  And other community members are still surprised when they discover their community guru is a crip.  Maybe that's because they've gotten used to our physically perfect avatars, staring at them day after day when they read our posts, avatars we can accessorize in almost any way with the exception of adding the equipment that helps get us through our days. 

Internet Behemoths, please hear our cries.  You have worked hard with us to make your communities accessible to us in every way except one.  You give us the tools to create graphical manifestations of ourselves, yet you leave out the accessories that are most important to our lives.  My avatar looks a lot like me in every way but one: where is my cane?

If you truly want me to feel welcome in your community, please make me feel equal and important.  I am the chick with the stick; my avatar should have a cane as well.

Tuesday, March 30, 2010

Sears Warning: DO NOT buy appliances from Sears

On March, 18, I purchased a brand-new HE washer/dryer set from Sears/K-Mart. I purchased delivery and installation with the machine. On March 22, the installer team arrived, hauled away the old washer and dryer, and supposedly tested the machine. I live on an island where houses must be elevated, so my laundry room is on the 2nd floor, above the garage. Since I had been several weeks without a washer, I was very excited, and washed a load as soon as possible. Bad idea. When I went outside, I saw a large puddle of water seeping out the garage door. When I opened the door, I found a large puddle of water (approx. 3 ft in diameter), as well as a large spot of water soaked drywall on the ceiling, directly under where the new machine had been installed. I immediately called the 800 number to report the issue and the damage to my home. Sears was unable to send anyone out until Friday the 26. I specifically told them that Sears had caused significant damage to my house, and that I needed them to send their insurance adjuster. They asked me to move the machine to look for an issue. I explained that I was disabled and physically unable to move the machine, which is why I had purchased delivery and installation services.

The 26th arrived, and a Sears van arrived at my house, 45 minutes after the 2 hour window they had given me on the phone. Instead of sending any type of adjuster, Sears had sent out another team of installers. I immediately showed them the damage. They responded that they were merely installers and would not do any kind of damage report. They verbally reported that a hose had been incorrectly installed, but they were sure that a leaky hose would not cause that degree of damage. When I asked who was going to come to assess the damage to my house, they called their supervisor to try to find out. The supervisor told them no one was going to come out to assess the damage; it was my problem and I would need to file with my own insurance company. I immediately called the 800 number. I told the customer service associate that instead of sending out an adjuster or a technician, they had merely sent out installers who had done nothing to help me with my issue. The associate informed me that the 1st associate had failed to initiate a claim, and he gave me a claim number. He assured me that the installation team would report the damage when they returned from the job, and told me they would call me back with additional information. He also told me they would send the proper personnel out the following day. I asked to speak with a supervisor. I was on hold for 30-40 minutes before the associate returned to the line to say no supervisor was available.

Saturday morning, another two people arrived. These 2 individuals could barely form a coherent sentence. I asked them if they were technicians or insurance folks, and they told me that they were just installers. They spent less than 5 minutes at my house, saying there was nothing they could do. I again called the 800 number, and they assured me that I should stay home, and that a technician would come out sometime that day. The technician arrived several hours later, and told me the machine was fine, but that my drain was blocked. He told me to call a plumber to assess the hook-up, and this was clearly not a Sears issue.

After wasting an entire Saturday (the 1st Saturday that it was sunny in months), I went back to the store that sold me the machine. The store manager and sales person spent about an hour on the phone with Sears and got no where. They assured me that they would try again Monday morning, during normal business hours. He called me early Monday morning to report someone would be coming out to assess the damage later that day. About an hour later, he called me back; no one was coming out. He said that the installers had reported there had been no installation issues, (despite the fact they had told me that hoses were not properly connected the first time,) and the technician on Saturday had said that my plumbing was the issue. So, as far as Sears was concerned, the case was closed. Sears told him that they had sent 3 people out, and that was more than they needed to do to resolve my issue. I needed to have a plumber come out, at my expense, to fix whatever the issue was.

The plumber came out today, and he spent several hours assessing the issue. The plumber's diagnostics showed that there was no issue whatsoever with my drains, pipes, or plumbing. He also said that the locations of the water damage (directly below the washer) was indicative of a washing machine issue, and in fact, was no where near where the drain pipe ran. The plumber's conclusion: my hook ups could not have caused the damage, my drain was fine, and I had no leaking pipes.

So, after spending about $1000 on a new washer/dryer, I am left with damages to my house that will exceed the cost of the appliances. I am left with a plumbing bill that adds another hundred dollars plus to my costs. I have a major mold issue developing in my house as well. Sears will not do anything to help me resolve the issue in any way. I can't get the old appliances returned, and if I try to return the new ones, not only will they not refund my delivery/installation costs, but I will have to pay a restocking fee.

I went to Sears when I needed new appliances because of Sears' stellar reputation. What did I get for it? I have spent literally 4 full days trying to get the issue resolved. My health is suffering. I am left with a destroyed laundry room floor and garage ceiling, an ever worsening mold issue, and absolutely unacceptable service from Sears. I have spent over a week trying to escalate this to a corporate level, to no avail. I am highly allergic to mold, and I have a stress-exacerbated disability. I have had nothing but elevated stress since the first set of installers left. I am still without functioning laundry appliances, and instead am left with a floor that may fall through any day. When that happens, I fully expect the response to be that THAT damage is not covered under my warranty.

I will share my experiences with everyone I know--stay away from Sears at all costs. You will be left with damages that far exceed the costs of the appliances to mitigate, and Sears will flat out refuse to do anything to help you. Just because Sears assigns you a claim number, do not believe that will get you anything. Be smart--call in your own professionals before allowing Sears to let the issue get worse. They will close your case and leave you worse off than you were before choosing to give Sears your money. Instead of an appropriate and timely response, you will get migraines, large bills to "verify" what you already know, and a "We didn't do it" response from Sears, despite hiring 3rd party professionals to verify that the damage was, in fact, Sears' fault. Do not waste the hours trying to resolve it through the channels Sears' suggests like I did. Read through the "MySears.com" forums BEFORE shopping at Sears so you are spared the heartache of having to post your own story of woe, echoing all of the others on their own forum. Don't waste the time and energy trying to accelerate your concerns through either the store or through the 800 number unless you actually like headaches. Do not expect Sears to send honest representatives out to address the issue, and ask for everything they say in writing. Be aware that spending money at Sears may leave you in a worse position than you were to begin with.

Sears' old "stellar reputation"? Well, that reputation is history, as far as I can tell, and in no way represents the "new" Sears. Every thing is outsourced, and Sears will not do anything to stand behind their subcontractors work. You will get robo-calls, asking you to complete a customer service survey. At the end of the call, you will be asked if you want a call back. Do not hold your breath waiting for that call back. I am still awaiting my call-back, and as of this minute, am unable to speak to a supervisor or anyone in corporate.

I will tell you all something--I know who I WILL NOT call to address my home damages--Sears Home Improvement Services. In fact, after this experience, I will never set foot in another Sears as long as I live.